- 用户的注册和微信授权
- 1. 让微信用户打开首页后,直接跳转到后台服务器
- 1.5 与后台的对接
- 查看效果
- 总结
用户的注册和微信授权
为了追求快速上线,项目组决定,去掉传统项目中的“用户注册”, “用户登录”, 直接使用微信的账户来核对。
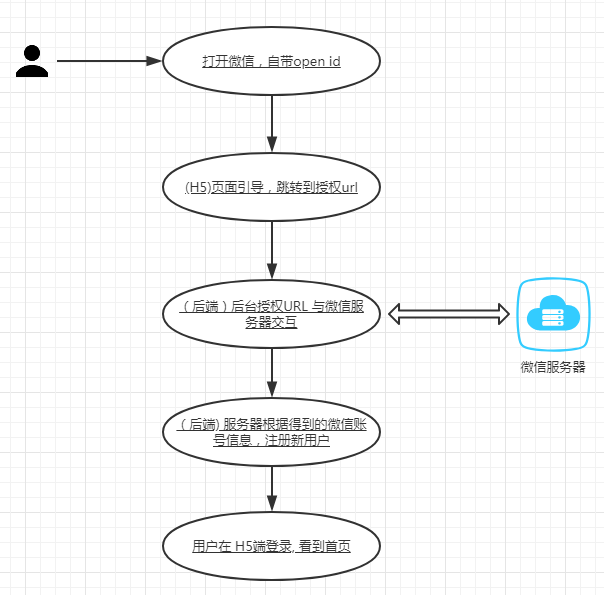
- 用户的微信浏览器带着当前微信用户的open_id,跳转到“后台服务器”。
- “后台服务器” 给“微信服务器” 发送请求。 获得当前微信用户的信息
- “后台服务器” 为该用户生成一个用户文件
- “后台服务器” 告知“H5端” 已经成功注册该用户。
- “H5端” 为该用户展示对应的页面。
如下图所示:

可以看出, 主要代码都是在 服务器端。
1. 让微信用户打开首页后,直接跳转到后台服务器
1.1 修改对应的路由文件(src/router/index.js):
Vue.use(Router)export default new Router({routes: [{path: '/wait_to_shouquan',name: 'wait_to_shouquan',component: require('../views/wait_to_shouquan.vue')},]})
1.2 增加对应的vue(src/views/wait_to_shouquan.vue) :
<template><div style="padding: 50px;"><h3>正在跳转到授权界面...</h3></div></template><script>export default {created () {window.location.href = this.$store.state.web_share + "/auth/wechat"},components: {}}</script>
可以看到, 上面的代码中, 使用到了 Vuex 来保存系统变量(后台服务器的地址) .
1.3 增加核心模板文件(src/main.vue) :
<template><div id="app"><router-view></router-view></div></template><script>import store from './vuex/store'import { SET_BASEINFO, GET_BASEINFO } from './vuex/mutation_types'export default {store,name: 'app',data () {return {user_info: {open_id: this.$route.query.open_id}}},mounted () {// TODO 开发环境下使用, 生产环境下注释掉// store.dispatch(SET_BASEINFO, {open_id: 'opFELv6YkJkMaH-xFkokTWCs5AlQ'})if (this.user_info.open_id) {store.dispatch(SET_BASEINFO, this.user_info)} else {store.dispatch(SET_BASEINFO)if (store.state.userInfo.open_id === undefined) {console.info('用户id和open_id不存在, 跳转到授权等待页面')this.$router.push({name: 'wait_to_shouquan'})} else {console.info('已经有了BASEINFO')}}},watch: {'$route' (val) {}},methods: {},components:{}}</script><!-- 下方的 CSS 略过 -->
可以看到, 上面代码的 mounted() 方法中, 会对 当前用户的open_id 进行判断. 如果存在,调到首页。 如果不存在,表示该用户是新用户。 需要跳转到授权等待页面。对应的代码如下所示:
if (this.user_info.open_id) {store.dispatch(SET_BASEINFO, this.user_info)} else {store.dispatch(SET_BASEINFO)if (store.state.userInfo.open_id === undefined) {console.info('用户id和open_id不存在, 跳转到授权等待页面')this.$router.push({name: 'wait_to_shouquan'})} else {console.info('已经有了BASEINFO')}}
1.4 增加对应的Vuex代码
目前来看, Vuex需要保存2个信息:
- 用户的open id
- 远程服务器的地址,端口等常量.
1.4.1 增加 src/vuex/store.js . 这个是最最核心的文件。 完整如下所示:
import Vue from 'vue'import Vuex from 'vuex'import userInfo from './modules/user_info'import tabbar from './modules/tabbar'import toast from './modules/toast'import countdown from './modules/countdown'import products from './modules/products'import shopping_car from './modules/shopping_car'import * as actions from './actions'import * as getters from './getters'Vue.use(Vuex)Vue.config.debug = trueconst debug = process.env.NODE_ENV !== 'production'export default new Vuex.Store({state: {web_share: 'http://shopweb.siwei.me',h5_share: 'http://shoph5.siwei.me/?#'},actions,getters,modules: {products,shopping_car,userInfo,tabbar,toast,countdown},strict: debug,middlewares: debug ? [] : []})
上面的代码中, 部分代码是在后面会陆续用到的。 我们不用过多考虑。 只需要关注下面几行:
export default new Vuex.Store({// 这里定义了若干系统常量state: {web_share: 'http://shopweb.siwei.me',h5_share: 'http://shoph5.siwei.me/?#'},modules: {// 这里定义了 当前用户的各种信息, 我们把它封装成为一个js对象userInfo,},})
1.4.2 增加vuex/modules/user_info.js 这个文件:
import {SET_BASEINFO,CLEAR_BASEINFO,GET_BASEINFO,COMMEN_ROLE,GET_BGCOLOR,GET_FONTCOLOR,GET_BORDERCOLOR,GET_ACTIVECOLOR,EXCHANGE_ROLE} from '../mutation_types'const state = {id: undefined, //用户idopen_id: undefined, // 用户open_idrole: undefined}const mutations = {//设置用户个人信息[SET_BASEINFO] (state, data) {try {state.id = data.idstate.open_id = data.open_idstate.role = data.role} catch (err) {console.log(err)}},//注销用户操作[CLEAR_BASEINFO] (state) {console.info('清理缓存')window.localStorage.clear()},}const getters = {[GET_BASEINFO]: state => {console.info('进入到了getter中了')let localStorage = window.localStoragelet user_infoif (localStorage.getItem('SLLG_BASEINFO')) {console.info('有数据')user_info = JSON.parse(localStorage.getItem('SLLG_BASEINFO'))} else {console.info('没有数据')}return user_info},[COMMEN_ROLE]: state => {if (state.role === 'yonghu') {return true} else {return false}},}const actions = {[SET_BASEINFO] ({ commit, state }, data) {//保存信息if (data !== undefined) {let localStorage = window.localStoragelocalStorage.setItem('BASEINFO', JSON.stringify(data))commit(SET_BASEINFO, data)} else {if (localStorage.getItem('BASEINFO')) {data = JSON.parse(localStorage.getItem('BASEINFO'))commit(SET_BASEINFO, data)} else {}}}}export default {state,mutations,actions,getters}
该文件定义了用户的信息的各种属性。
1.4.3 增加 src/vuex/mutation_types.js
export const SET_BASEINFO = 'SET_BASEINFO'export const GET_BASEINFO = 'GET_BASEINFO'
上面内容定义了该对象的两个操作。
1.4.4 增加 src/vuex/modules/actions.js
import * as types from './mutation_types'
可以看到上面的内容对于 mutation_types 进行了引用。
1.4.5 增加 src/vuex/modules/getters.js
// 先放成空内容好了
这个文件先这样存在,目前阶段不需要有任何内容。
1.5 与后台的对接
后台的同学, 为我们提供了一个链接入口:
http://shopweb.siwei.me/auth/wechat
我们让H5页面直接跳转过去就可以。 这里不需要加任何参数, 直接由后端的同学搞定接下来的事情。
查看效果
在微信开发者工具中,打开我们的H5 页面, 就会看到页面会自动跳转.
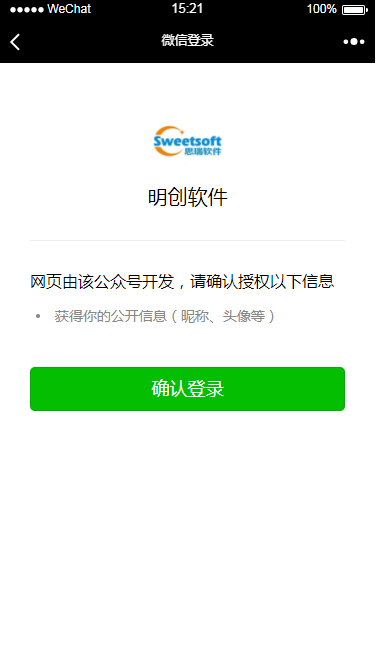
观察仔细的同学可以看到有两次跳转:
第一次跳转到 http://shopweb.siwei.me/auth/wechat第二次跳转到 https://open.weixin.qq.com/connect/oauth2/authorize…
如下图所示:

点击“确认登录”按钮,进行授权后,就会进入到H5的首页
总结
本节中,为了做一件事: 让用户跳转到微信授权,并注册, 我们做了如下的程序层面的内容:
- 使用Vuex 记录系统常量(远程服务器的地址)
- 使用Vuex 记录用户的信息(新增了一个对象:user_info)
- 使用了一个独立的页面(等待微信授权页面)
- 每次打开首页之前,都要判断该用户是否登录。
- (后台任务) 让该用户在微信端授权, 并且在本地生成一个新的用户, 然后把相关数据返回给前端
Vuex 是Vuejs 最复杂最不好理解的地方。 同学们不要怕。 之所以这么麻烦, 可以认为是javascript的语言特性决定的。 就好像java, C语言中大量用到的设计模式, 在现代编程语言(Ruby , Python, Perl)中就用不到, 可以有更加简单的办法, 例如Mixin)
另外,本节对于后端的同学是个挑战, 不但要在微信端做修改,还需要对微信返回的数据结构很熟悉。 由于本书内容所限,不再赘述。
